Search This Blog

Wednesday, November 30, 2011

Carrot Sticks

Crunchy and delicious, you won't believe these are healthy for you! Not fried, no added chemicals or sugars, your kids will gobble them on up! Super easy to make, your kids will love to help out in the kitchen with these. Use about a carrot per person for regular appetites. Me, I can eat most of this to myself its so good!

I have it pictured with my Split Pea Soup.


4 Carrots, peeled
1 tsp Olive or Peanut Oil
1/4 tsp Sea Salt
1/2 tsp Crushed Red Pepper Or to taste

1) Heat oven to 350. Line two baking sheets in foil and spray with Pam.

2) Using knife, slice into sticks and place in bowl. Pour in oil, salt and red pepper, mix well to coat carrots. Place on baking sheets in one layer. Place both sheets in oven on different levels/racks.

3) Bake for 6 minutes then rotate pans. Bake another 6-8 minutes until carrot edges begin to turn brown. Let cool 5 minutes.

Serve with Ranch Dip.

Split Pea Soup

Yeah, not a soup a lot of folks like just from the word Pea. Personally, I love it. Nice and creamy, warm and soothing on a cold winter's day. This makes a good size concentration of soup. Enough for either a party of 8 or just scoop it into freezer bags, lay flat and freeze. This is what I do so I can have pea soup whenever the urge occurs! The best part is this can be a dairy free soup!

I have it paired with my Carrot Sticks.


16oz Dried Peas
2 Carrots, diced
2 cup Ham, chopped
3 tbsp Garlic, minced
2 Bay Leaves
2 tsp Parsley, dried
1/2 tsp Crushed Red Pepper
1/2 tsp Salt
1 cup Spinach, fresh
1 tsp Worestershire Sauce
6 cup Chicken Broth
1 cup Milk or Water
Sour Cream (Optional)
Carrot Sticks

1) In crock pot, layer each ingredient as listed except for the milk/water. Set on low and let cook 8-10 hours. 

2) Remove about half and whip in blender. Return to pot and add the milk/water. Use as much as you like depending on how thick you want your soup. Bring back to heat and serve warm with a dollup of Sour Cream on top and Carrot Sticks on the side.

Sunday, November 27, 2011

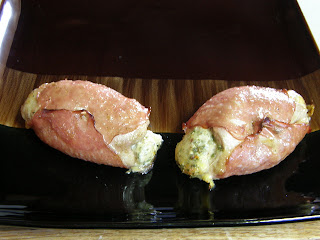
Chicken Parcels

Here we go again... found a great sounding recipe at My Delicious Recipe and couldn't get all the ingredients at our local grocery store. So we had to improvise. If you check out theirs along with mine below you will see how far away I went to get something to come out tasting great with what we could get our hands on.

This recipe will make 6 parcels. If serving this with cheesy rice and sauteed vegetables, you will probably only need one per plate.


3 tbs Butter
1 tbsp Peanut Oil (or Olive)
2 tbsp Garlic, minced
1/4 tsp Chicken Season Salt
6 large Basil Leaves
1/2 cup Muenster, grated
1 Egg, slightly beaten
1 tbsp Parsley, dried
1 tsp Oregano, dried
1/4 tsp Red Pepper Flakes
6 slices Jalapeno (in a jar is fine)
6 Chicken Thighs, boneless, skinless
2 pks Ham, thin slice lunch meat (Budding)

1) In small skillet melt butter in oil and saute garlic with chicken seasoning. Strain into bowl, reserving liquid for basting later. Let cool at least 10 minutes.

2) Preheat oven to 350. Line baking sheet in foil and spray a roasting pan with oil, set on top of foil.

3) In large bowl, mix together cheese, egg, parsley, oregano and pepper. Set aside.

4) Place individual breasts in plastic bag layed out flat. Using hammer, skillet bottom or rolling pin flatten thigh by half thickness.

5) Lay out chicken on flat surface. Place a basil leaf, a spoonful of cheese mixture and a jalapeno slice near the edge. Roll up chicken, then wrap it in a couple of ham slices and use toothpicks to hold it together. Repeat to finish off all thighs.


6) Roll parcels in reserved butter and place on roasting pan. Bake for 20 minutes and baste one more time. Finish baking another 10 minutes. Let rest 5 minutes before cutting into them.

Steak & Potato Soup

It's definitely soup weather around here. Yesterday we had an early shower of snow and this morning we work to find the bird bath frozen over. You know what that means... SOUPER WEATHER! hehe Yes, I went there.

This recipe is a hearty, stick to your ribs soup that uses left over steak. If your man (or woman) is a steak and potato kind of person, this is the perfect recipe for them. We had some steak we grilled and it was pretty tough so I turned it into a tender soup that melts in your mouth. This recipe makes about 2 servings (depending on your appetite of course).


4 T butter, cubed
1 T Olive Oil
1 T minced Garlic
1 T minced Onion
1 tsp Italian Seasoning
1/2 C Carrots, diced
1 Celery Stalk, diced
1 1/2 - 2 cups Pre-Cooked Steak, chopped (or you can always use cube steak)
2 T Flour
3 C Water (or Chicken Stock)
2 Cup Milk
2-4 Potatoes, diced, skin is optional
1/4 C Green Beans, diced (frozen or can prefered)
1 T Cream Cheese
1-4 Bacon strips (Precooked), diced
Dollop Sour Cream (Optional)
Cheddar Cheese, grated (about 1 tbsp per serving) (Optional)

1) Melt butter and oil in large saucepan.  Add first 5 ingredents and let simmer until veggies are getting tender, about 10 minutes. After the first 5, add in the steak.  Stir in flour and let cook about 2 minutes while stirring.

2) Slowly add in water and milk while stirring, Then drop in potatoes. Bring to slow simmer and reduce heat to med low. Slow cook 1 1/2 to 2 hours until potatoes and tender. Using large ladle, put about half soup mix in a blender and puree about 10 seconds. Pour back in pot. Add diced green beans, cream cheese and bacon and stir. Cook another 10 minutes until cream cheese is melted into soup.
3) Add a dollop of sour cream and sprinkle with grated cheddar on top just before serving.


Saturday, November 26, 2011

Queso Burritos

Just because I live out in the middle of nowhere, where the town seems to be stuck in the 1800s, doesn't mean I don't get into a rush from time to time. I drive about 80 miles round trip to get my grocery shopping done each week. By the time I drag all the bags up the side of our mountain, I'm pretty wore out and don't want to think about dinner. It was one of those days I came up with this recipe. Its quick, easy, small clean up and delicious! The following recipe serves 2 but its really easy to expand for bigger families.


Frozen Burritos (any variety)
Lettuce, chopped (any variety but Romaine has the best color for this)
Tomatoes, chopped (enough to sprinkle over the top)
Onions, chopped (optional)
Jar of Queso Cheese Dip (any variety)

1) Preheat oven to burrito package directions. Line casserole dish in foil (for easy clean up) and spray with Pam.

2) Place burritos in pan, side by side, cover with queso. Bake according to package directions. Make a small slit in center of center burrito and check for doneness. Their just not so good when you bite into something frozen.

3) Gently pull them out using a spatula and lay on top of chopped lettuce. Sprinkle tomatoes and onion over top and serve.

Friday, November 25, 2011

Spanakopita or Spinach Pie

Yep, the day after Thanksgiving you won't be finding any old Turkey dishes here! This here gal isn't too traditional. I prefer my turkey at someone elses house! No huge clean up for me! My hunny and I had our Turkey Dinner down at the Big Bend Lodge. All you can eat buffet with all the trimmings an no dishes! What more could a gal want? How about this view we had while scarfing down dinner?!

OK, so you didn't click into the blog for pictures of our trip. But you have to admit, it WAS a great view!

So, here is a classic Greek dish by way of FAR West Texas. Spinach Pie in a flaky phyllo crust to wash down all that turkey you all ate yesterday!


9oz package Fresh Spinach
1lb Ground Beef
1 tbsp Olive Oil
1 tbsp Butter
2-3 tbsp Garlic, chopped
8oz White Mushrooms, chopped
2 tbsp dried Dill
1 tsp Chili Powder
Phyllo Roll
1 Egg, beaten with 1 tsp water
Parmesan (or 4oz Feta crumbles)
1-2 tsp Red Pepper Flakes (or to taste)

1) Cook spinach in salted water until wilted, about 10 minutes. Strain and leave in colander to cool.

2) In large skillet, brown meat and strain off excess grease. In same pan, add oil and melt butter. Add garlic and cook about 2 minutes then add mushrooms, dill, chili powder and return beef to pan. Cook until mushrooms are tender. Pour meat over spinach mixture and let cool.

3) Preheat oven to 375. Spray baking sheet with Olive Oil Spray.

4) Gently lay out one sheet of phyllo on pan, making it drape over edge about 1 1/2-2 inches. Repeat with 3 more sheets to cover pan bottom. Brush all with egg mixture and place two more sheets down the middle.

5) Spread spinach mixture evenly over dough. Sprinkle with Parmesan cheese and red pepper.

6) Layer remaining phyllo sheets across top, brushing each with egg wash until finished. Wrap overhanging dough over top.

7) Cut pie into diamond shapes. Place in oven for about 30-45 minutes. You will need to recut the pieces before serving.

Tuesday, November 22, 2011

Twisted Carrot Salad

Since most people do not like raisins, much like my own hunny, I tried to make this a little different. Amazingly, I was able to hunt down all the ingredients out here and it turned out pretty yummy. This recipe makes about 4 cups. It really depends on how fruity you like it and the size of your carrots. Its easy to make it creamier than stated here as well. Just add more salad dressing to it. If your not into it being so sweet, use regular mayo instead of Miracle Whip.


5-6 Carrots, peeled and grated
1/4 cup Miracle Whip Salad Dressing
3 tsp Spicy Brown Mustard
3/4 cup Pineapple, chopped and squeezed to remove excess juice
1/2 tsp Pineapple Juice
3/4 cup Craisins Pomegranate

1) Im large bowl mix salad dressing, mustard and pineapple juice. Add carrots and fruit, stir to combine.

2) Let side for at least 30 minutes to incormprate flavors and let the fruit soften up. Serve chilled.

Baked Sausage Casserole

Here is one a friend of mine sent and living out here, of course we had to switch some of the ingredients around. I am only able to find zucchini from time to time and most of the time its not of a quality I would purchase, much less try to eat. So, instead of zucchini I would use the large portebellas. They flavor up well and soak up all the flavors of the sauce and meat. This recipe will serve between 6-8 folks.


1lb bulk Sausage (any variety)
1/2lb ground Beef
1 Zucchini, thin sliced
1 cup sliced Mushrooms
1 tbsp Flour
4 8oz can Tomato Sauce
1 tsp Garlic Powder
1 tsp Garlic Salt
1 tbsp dried Oregano
1 tbsp fresh Basil, chopped fine
Salt & Pepper to taste
1 cup Milk
1lb Pasta, cooked, drained (any variety will do, but the mini bow ties just look so cute in this dish)
2 1/2 cup Mozzarella, shredded
1/4 cup Parmesan
1 cup Colby, shredded

1) Preheat oven to 350. Line 13x9x2" pan in *foil or spray it with pam.

2) In large skillet, crumble and brown all meat, remove meat from pan to paper towels. In pan drippings add flour and stir to combine. Add tomato sauce, spices and milk. Stir well and bring to boil. Remove from heat and add pasta, and stir.

3) In pan, layer zucchini to cover bottom. Layer in meat.  Layer in mushrooms. Sprinkle 2 cups of the mozzarella, 1/2 cup of the colby and parmesan. Add pasta mixture. On top sprinkle remaining cheese. Place in hot oven and bake 25 minutes until bubbly.

4) To serve, garnish with fresh basil and Parmesan!

* Lining your pans in foil help to keep the clean up super simple.

Monday, November 21, 2011

Triple Chocolate Cookies

Oh yeah... doing the happy white girl dance (its not a pretty thing)... I baked edible cookies! More than edible... these are the bomb! I might turn out to be a baker after all!

It all started on a search for some good ole chocolate chocolate chip cookies. It's one of those recipes that you just can't find anywhere... so I made my own. And it worked! Can you tell how excited I am yet? This recipe will make between 12 and 24 cookies... depending on how big your spoon is.


2 1/4 cup All Purpose Flour
3 tbsp Cocoa Powder
1 tsp Baking Soda
1/2 Tsp Salt
1 cup (2 sticks) Butter, softened
3/4 cup Sugar
3/4 cup Light Brown Sugar, packed
2 tsp Vanilla
2 Eggs
1 cup Semi-Sweet Chocolate Chips
1 cup White Chocolate Chips
1 cup Walnuts, chopped *(optional)

1) Heat oven to 350 (325 for a toaster oven).

2) Whisk together flour, cocoa, soda, and salt until incorporated.

3) In large bowl beat butter and sugars until creamy. Add vanilla and eggs and beat until smooth. Slowly add in the flour mixture until all is blended. Stir in chips and nuts.

4) Drop mixture by the spoonful onto a lightly greased cookie sheet, sides not touching. Bake for 8-10 minutes. Let cool 5-10 minutes before removing from pan.

*Since I am allergic to nuts, I put them all on individually. 

Saturday, November 19, 2011

Flounder Florentine

Here is something that my own hunny gobbled up. I had to integrate about four different recipes to get this to come out right with the ingredients I was able to get my hands on. Living so far out west makes it extremely hard to find decent seafood. We seem to be on the tail end of all shipping lines. This means that most things are a few days to a week over the due date. I was really lucky to come across flounder fillets that hadn't expired yet. This recipe serves 1-2 depending on the appetite. You can easily double it though.


2 Flounder Filets
4 cup Chicken or Vegetable Broth
Salt
Spinach, fresh, chopped
3 tbs Butter
2 tbs Flour
1/2 tsp Cayanne
1/2 cup Milk
Parmesan

1) Preheat broiler to 450. Grease glass baking pan (glass pie plate works well)

2) In medium saucepan bring broth to boil. Add flounder and return to boil. Reduce heat and let simmer about 10 minutes until fish flakes with fork. Remove fish to plate and keep warm. Add spinach and salt to broth and simmer about 4-5 minutes until spinach wilts. Pour all into strainer and return pan to heat.

3) Place spinach in bottom of baking pan and then place fish on top.

4) Melt butter in pan. Add flour and cayanne and stir until flour thickens and turns a light brown.  Slowly add in the milk and stir utnil it thickens again. Pour white sauce over fish and sprinkle with parmesan. Broil at 450 just until fish is browned, about 10 minutes or so. Keep an eye on it as oven heat varies.

Wednesday, November 16, 2011

Chicken and Portabella Mushroom

Unlike in the big city, finding pre-made items at the local grocery store is almost impossible. Take ravioli for instance... if I like Chef Boy Ar Dee, I wouldn't have a problem. Unfortunately, my taste buds would go on strike for eating something like that out of a can. So what's a girl to do??? Hunt down some great recipes and twist them up to make her own dish that screams West Texas!

This turned out so well that one of our birds, Greedy Gut (yes, that really is what I call him), had to have some too. He paced on the bottom of his cage, squeaking to get our attention. When that didn't work, he climbed to his perch and began pacing again. I felt so bad for him I finally brought him a part of the dough. Want to see what a bird looks like after eating this? Just scroll on down to the bottom.


For the Dough:


2 1/2 cup All Purpose Flour
1 tsp Salt
1 cup Hot Water


For the Filling:


1/2 large Portabella, diced small
1/2 cup Mozzerella, shredded
1/4 cup Parmesan Cheese
1/2 tsp Basil, dried
1/2 tsp Oregano, dried
1/2 tsp Garlic Powder
1 tsp Crushed Red Pepper
1/2 cup Chicken, cook (such as Rotisseri)
2 Eggs, seperated

1) In large bowl mix flour, salt and water with a spoon. The batter will be crumbly. Transfer to a floured surface and knead with your hands until it begins to form a ball. Wrap in plastic and let rest in fridge for about 20-30 minutes.

2) While dough rests, shred chicken and place in large bowl with remaining ingredients, except one egg. Mix thoroughly.

3) In small bowl, beat remaining egg and 1 tbs of water to make a wash.

4) When dough is ready, Pull off a small amount and roll out flat until it is about 1/16th" thick, and in a rectangle about 12x4". Brush with egg wash.


5)  Place a spoonful of mixture in three seperate heaps, gently pull dough to cover them, and press down around mounds to seal. Trim off excess dough and set aside. Finish with the dough and mixture.


6) In a large pot of boiling salted water drop the ravioli in a few pieces at a time and boil about 5 minutes. I like to let mine float to the top and leave them about another minute, just to make sure the inside is heated through. Remove ravioli to plate and keep warm.

7) Now all you have to do it smother it in your favorite sauce or eat it plain!


Stuffed French Toast

For years now I have not liked syrup on any of my breakfast foods. The smell of it alone can turn me away from the table. But eating pancakes dry isn't an option either. So, in my quest for something different, something sweet without the syrupy smell, I created a sauce that works great. Now it seems I-HOP has the same idea... or at least part of it at any rate. But I'm biased... I prefer my own method since it's made by scratch in a kitchen I can be in.


1 egg per serving, beaten
1 tsp Half & Half per serving
Cinnamon
Jiffy/Bisquick Baking Mix, amount really depends on amount of people serving
2 pieces Honey Bread per person (or any thick cut bread)
1 tbs Cream Cheese per person
1 tbs jelly, jam or preserves per person (I used Blue Berry Preserves in this one)

1) Heat griddle or skillet to medium. Either spray pan with butter flavored spray or use butter/margarine in pan... even if it's a "non-stick". Honey bread tends to stick otherwise.

2) In bowl big enough to lay out bread, beat egg, cream and cinnamon (to taste) together. Add about 1 tsp of the baking mix at a time, blending well, until a pancake batter consistency forms.

3) Dip bread in batter and coat well. I like to let mine soak about a minute to absorb the liquid. Then place in skillet. Keep a close eye on it so it doesn't burn and flip when its golden brown. Repeat for the other side.

4) Meanwhile, In a small bowl, stir together the cream cheese and preserves until blended well.

5) Once the bread is golden brown on both sides, remove to plate. Spread cream cheese mixture on one side of both pieces of bread, and put them together to form a sandwich.

6) Sprinkle with powdered sugar and more cinnamon if you want.

Honey Bread

In my search for some good breads out here, I came up empty. I realized that we have no bakery here. Well, there is one in alpine that makes cinnamon rolls and such, but if you want home baked breads, you better learn how to do it yourself. Which is what I've been attempting for years.

Most of the time I end up with hollow bread. Or flat bread... that weighs a ton. Until recently I just couldn't get the hang of making bread. Now that I'm older the good Lord has blessed me with the secret know-how of how to end this long time curse. And since I'm a nice person (OK, ya'll can stop laughing now) I thought I would pass it on to my internet friends and family.

The recipe below will make up to 4 loaves. You can leave it in the fridge for 3-4 days even and make a loaf per day! I like changing it up and in later issues, I'll give you some hints on bread mixtures that start with this one recipe. There is no picture today since I am unable to get to my camera without someone tearing into it. I guess I'm going to have to make this when one of my friends comes to visit.

3 cups warm water
1 1/2 tbs (or 2 packets) Dry Active Yeast
2 tbs Course Salt (I prefer Sea Salt but Kosher works too)
6 1/2 cups All Purpose Flour
Honey

1) In large bowl ( I used my crock pot for this), mix water, yeast and salt until yeast dissolves. Mix in flour. Batter will be wet and loose. Transfer to a bowl that has a lid or cover tightly with plastic wrap and poke a small hole in it. You want the gasses to escape.

2) Now set it on top of your refrigerator for about 2 hours to let it rise.

3) Place bowl in refrigerator for at least 3 hours. Dough works best after it's been chilled.

4) When ready to make bread, pull out 1/4 of dough and place on a flat, floured surface and shape your loaf, pulling across the top to make it tight. Set on a lightly greased baking sheet and let rise, uncovered, about 30-40 minutes (this is where you put it back on top of your refrigerator again. Its OK if it doesn't rise too much, it will rise in the oven.

5) Preheat oven to 450. If using a toaster oven drop the temp to 400 and do not use the fan. This will burn it. Place a separate pan filled with water on the bottom rack of oven.

6) Just before baking, cut a long slit in top of loaf, down the length. Gently separate it and fill it with honey. Drizzle honey all over it top if you want it extra sweet like I do. Pour water in heated pan (the steam will help to brown the loaf) to fill it and place bread on rack over it. Bake for about 25-30 minutes, turning loaf pan half way through.

7) Now, let this cool on a wire rack for 15 minutes before you tear into it. I have to stand over it with a butcher knife in each hand to keep my hunny from getting at it.

Monday, November 14, 2011

Pomegranate, Apple & Bourbon Muffins

I was on a search of a different recipe using up the remaining apples I had sitting on my counter. I hate to waste anything, but one person can only eat so many apples in their salads before they explode. On top of that, my partner isn't too keen on apples, so hiding them in food for him has become a challenge. What I ended up with worked out pretty well. The flavors complement each other without anything being over powering.

I used Red Stagg Black Cherry Bourbon for this. The fruity flavors blended nicely with the apples. This makes about 12 muffins.


1 cup Pomegranate, dried
1/3 cup Bourbon 
1 3/4 cup Flour
1 tsp Cinnamon
1/4 tsp Ginger, fresh grated
1/4 tsp All Spice
1/4 tsp Nutmeg, fresh grated
3/4 tsp Baking Soda
1 tsp Baking Powder
1 1/2 cup Splenda (real sugar works as well)
2/3 cup Oil
2 Large Eggs
1 tsp Lemon Juice
1 Medium-Large Apple, peeled, cored and diced small

1) Soak Pomegranates in bourbon no more than 30 minutes, strain, reserving liquid and bring liquid back to 1/3 cup.

2) Preheat oven to 375. Grease muffin tins.

3) In medium bowl combine flour, spices, baking powder and baking soda.

4) In large bowl beat the sugar, oil, eggs and lemon until smooth.

5) In portions, add in the flour mixture and stir until semi smooth. Then add in the fruits and bourbon. Mix with spoon until all is well blended.

6) Using spoon, place mixture into muffin tins to fill up to the top rim. Bake about 20 minutes. The top will brown nicely and you should be able to insert a toothpick in the center of a muffin and remove it cleanly.

Now, this recipe doesnt call for a frosting, but I found that adding a light drizzle of sugar glaze to them makes them outstanding!

Herbed Potato Gnocchi

The first time I went looking for pre packaged Gnocchi, I had the store attendant stand there looking blankly at me. Never before had this store in far West Texas ever heard of this classic Italian staple. After shopping in 3 different stores... in two different towns, I did finally find some... at a HUGE price. Almost 5 dollars for a pound! This just simply won't do. After all, it has all of 3 main ingredients.

Back to the internet for me. I found many versions of it, but none that had my mouth watering, so I finally figured I was going to have to come up with my own, Texas version of it. The recipe below makes about 4 servings.


2 Potatoes, peeled and diced
2 cups All Purpose Flour
1 Egg, slightly beaten
1/2 tsp Basil, chopped or dried
1/2 tsp Sage, ground
1 tsp Rosemary, crushed
1/2 tsp Thyme, ground
1/2 tsp Oregano, dried

1) Boil potatoes in a large pot of salted water until tender, about 10-15 minutes. Drain, mash and let cool completely.


2) Combine cooled potatoes, flour, egg and spices. Knead until dough begins to hold form. Add more flour as needed.


3) taking only small amounts of dough, begin shaping into long "snakes" by pressing from the center out. You want it to be about 1/2" across the top by about 1/4" thick. Then slice into 1/2" pieces.

4) Bring a pot of salted water to boil and drop in enough gnocchi pieces to cover the bottom in one layer. Let these boil for 3-4 minutes until they float to the top. Remove one and cut into it to make sure it has cooked through.

I serve this with an Italian Red Sauce, Pesto Sauce or plain Garlic Butter. Enjoy!

Sunday, November 13, 2011

Kielbasa With Polish Sauce over Pasta

My family loves a good sausage dish. So while taking a trip over the internet to find new and interesting recipes for sausage, I found this one that only had a few ingredients I was unable to find. But no fears... I AM the master (or mistress?) of improvising! Enjoy this Polish turned West Texan dish! Serves about 4.


12oz Dark Beer
1 1/2cup Water
2 tbsp Garlic, minced
1 lb Kielbasa
Salt & Pepper to taste
1 tsp Crushed Red Pepper
2 tbsp Butter
2 tbsp Flour
2 tbsp Rice Wine Vinegar (Plain White Vinegar works too)
1 tsp Sugar
1 tbsp Corn Starch
1 tsp+ Water
2 Tbsp Parsley, dried
2 cup Pasta, cooked and kept warm

1) In saucepan over medium heat mix beer, water, garlic, kielbasa, red pepper, salt and pepper to taste. Bring to boil, reduce heat, cover, simmer about 25 minutes. Turn meat periodically, to coat. 

2) Remove meat to plate and let cool. Slice meat into 1" slices.

3) In large skillet melt butter, making sure not to burn it. Add flour and cook 4-6 minutes, stirring constantly, until light brown. Add vinegar and sugar, stir. Add remaining beer mixture and more salt and pepper to taste. Bring to boil, reduce heat to simmer. 

4) In small bowl mix corn starch and remaining water, add to beer mixture and whisk well to incorporate. Simmer mixture until it coats the back of a spoon, about 10-15 minutes. Return sausage to pot and cook another 5 minutes.

5) Garnish with parsley. Serve over any variety of cooked pasta. The sauce works best with a ridged pasta... something that can grab and hang on tight to the sauce.

Friday, November 11, 2011

5 Minute Omelets

Here's breakfast for all those who wake up late in the morning. Its so easy my own daughter can do this one! The ingredients are interchangeable which really makes this a great recipe! Just like the 5 Minute Cake, all you need is a fork, mug and of course, thee microwave! Perfect for dorms too!


2 Tbsp Onion, diced
2 Tbsp Green Pepper, diced

***The Ingredients can vary depending on your flavor***

2 Eggs, beaten
2 slices Sandwich Ham, chopped
2 Tbsp Cheddar, shredded

1) Spray mug with cooking spray. Butter flavor works best!

2) Place onion and bell pepper (or which ever veggie you choose to use) in mug and microwave for 1 minute on high. Remove from mug and blot with paper towel.

3) Add egg to mug and microwave 1 minute. Replace onion and pepper to egg, fluff with fork and add ham and cheese. Microwave 1 minute more. 

4) Pour out onto plate and top with extra cheese! Yum!!!

Banana Nut Bread

Oh my... the smell of Banana Nut Bread baking... it just fills the house with such pleasant aromas! It reminds me of days long gone, growing up with a baker across the street from me. I'm surprised I made it out of childhood without weighing a ton! That woman could really bake! Not sure how I came out not being able to bake if my life depended on it though.

It seems that up until just recently, every time I tried to bake ANYTHING, it would come out hollow, burnt, raw or so nasty the family dog wouldn't touch it. This is using pre-boxed treats like cookies, brownies, cakes. I even tried using a bread machine (5 different kinds) to come out with hollow breads.

In the last few months though, it seems all those early years are finally catching up with me. I have come up with a wonderful bread that isn't hollow and even tastes fantastic. A good friend of mine has even used the recipe to create it in her own home. I'm so surprised that it came out well (like Ive said before, I'm SO NOT the baker) that I thought my readers would like to give it a go.


2 1/4 cup Jiffy Baking Mix (Bisquick works as well)
8oz Cream Cheese, softened
1 cup Sugar
1/2 cup Butter, softened
1 cup Banana, mashed (about 2) ( my family likes it with more banana so I will use 2 cups!)
2 eggs, slightly beaten
1 tsp Cinnamon
1/2 tsp Baking Powder
1/4 tsp Baking Soda
1 tsp Vanilla
1 cup Nuts, chopped (use an extra cup for those nutty folks in the family tree!)

1) Preheat oven to 350. Grease pan(s) and set aside.

2) In large bowl, mix cream cheese, sugar and butter. Add banana then egg. Mix in remaining ingredients. Blend well. 

3) Pour into pans and bake uncovered:
Large Loaf: 55-70 minutes
Small Loaf: 40-55 minutes
Until toothpick inserted in middle comes out clean. Let cool completely on wire rack.

OPTIONAL
Smother top in icing, let set before slicing.

Basic Icing:
Pour about a cup of powdered sugar into medium bowl. Add a tablespoon of water at a time,  while whisking, until you get the proper consistency needed. Play around with sugar and water amounts to fit your needs. If you want a good twist, add in a dash of vanilla or orange extract!

Thursday, November 10, 2011

5 Minute Orange Kissed Chocolate Cake!

There is an EVIL woman with whom I call mom who sent me this devilishly good recipe for a five minute chocolate cake. Yep, there goes the diets ladies! No more pulling out the mixers. All the equipment we need now is a fork and a mug and of course... a microwave.

I have never been a fan of cooking in the new age box, its only been good for reheating my coffee... until now. Thanks to my evil mother, I can bake a cake for two (only if your partner wins at dueling forks that is) while I'm finishing off the diner dishes.

For my first attempt I went ahead and used a cream cheese frosting, but we found it way too sweet for that. If anything, on my next attempt I will only use a powder sugar glaze. It really is pretty sweet without anything.

Heres everything you will need:

4 tbsp All Purpose Flour
4 tbsp Sugar
2 tbsp Cocoa Powder
1 Egg, beaten
3 tbsp Milk
3 tbsp Oil
3 tbsp Chocolate Chips
Dash Vanilla Extract
Smidgen Orange Extract

Below are some pictures to help you on your way:

1) Mix all the dry ingredients in a large coffee mug.
2) Using fork, mix in egg, milk and oil. Then add the extracts and chips.
Not pretty, but bare with me...

3) Now, place the mug in your microwave for 3 minutes on high (1000 watts). Do not freak out when you see the cake begin to grow up and over the rim of the mug. I panicked to no avail. Its not going anywhere.

4) Leave the mug in the microwave for about 2 minutes, then set it on your counter to cool. I gave mine about 5 minutes.

5) Run a knife along the edge to help the cake slide, hold the mug upside down on plate and let the cake slide out. Be careful, its still really hot!

Its hard to tell in this pic, but the steam fogged up my camera. So again, it is REALLY hot when it comes out.

6) For those who like things really sweet, go ahead and frost this baby. As stated before, I used a cream cheese frosting and the back of a spoon.

OK, ya'll can stop laughing now. We all know I am so NOT the baker!

Shells with Balsamic Brown Butter Sauce

Here is a light dish that packs a lot of flavor. It's one of those in which you can swap out different ingredients to make it your own. I prefer using a pasta that will "grab" the sauce such as shells or even rigatoni, but in truth, any will do.

This delightful dish serves about 4 depending on how hungry your crew is.


Pot of boiling Water
2 tbsp Salt
1 cup Pasta (any will do, I prefer shells with this one)
5-6 tbsp Butter
1 tbsp Garlic, minced
1 tsp Basil, dried
1 tsp Parsley, dried
1/4 tsp Crushed Red Pepper (or to taste)
1/4-1/2 cup Summer Sausage, diced
3 tbsp Balsamic Vinegar
1 cup frozen Broccoli (or any frozen vegetable)
2-3 tbsp Parmesan Cheese

1) Drop pasta and salt in boiling water and cook to package directions.

2) In large skillet, melt butter and saute garlic, basil, red pepper and parsley about 5 minute on med-low heat. Do not let butter burn.

3) Add meat and balsamic vinegar to skillet when pasta is about 3 minutes to done.

4) Drop frozen vegetable in pasta water about 2 minutes before pasta is done.

5) Drain pasta and add to  skillet. Cook another 2 minutes and remove from heat.

6) Sprinkle with parmesan cheese just before serving.

Wednesday, November 9, 2011

Roasted Tomatoes with Gorgonzola & Cheese

I'm not sure where I first found this recipe, but it was just so darn good I had to pass it along. It calls for Gorgonzola but you try to find that around here... at least for a price that doesn't deplete your bank account!

I have used a mixture of Havarti and Blue Cheese and it came out wonderful! But go ahead and try to switch it around with local cheese in your area.

This recipe makes 16 single servings.


8 Roma Tomatoes
2 Garlic cloves, minced
1/4 cup Olive Oil
Salt
Pepper
3/4 cup Bread Crumbs
1 cup Gorgonzola (or in my case 1/2 cup Blue Cheese crumbles and 1/2 cup Havarti chopped)
2 tbsp Fresh Basil, chopped (or 1 tsp dried)
Fresh Parsley

1) Slice tomatoes in half, remove seeds and place cut side down on paper towel to drain.

2) In large bowl mix together olive oil, garlic, salt and pepper to taste. Add tomatoes to marinade and coat well.
 
3) In small bowl mix together bread crumbs and gorgonzola (or other cheeses) and the basil.

4) Place parchment paper on baking sheet (if you do not have parchment paper, use foil and cover in an Olive Oil Spray like Pam). Lay tomatoes in one layer, cut side up. Top with bread crumb mixture then sprinkle with a drizzle of olive oil. Bake @ 375 for about 20-25 minutes until golden on top.

5) Just before serving top with fresh parsley.