Search This Blog

Thursday, July 5, 2012

Mex-Tal Stuffed Shells

Does your family often argue over the dinner menu? The dish I have here today will cover the fight for both Mexican and Italian in one easy dish. I have always been afraid of trying to produce the perfect stuffed shell. Good thing for this recipe! The ooey-goodness of the melted cheeses and sauce cover any flaws that happen when you fill up the shells.

(See, you can't see that a shell was split in half while being stuffed!)


15 Jumbo Pasta Shells
1lb Ground Beef
1 (10 ounce) can Enchilada Sauce
8 oz Tomato Sauce
1 teaspoon Minced Garlic
¼ teaspoon Dried Oregano
1/2 teaspoon Dried Basil
¼ teaspoon Ground Cumin
½ cup Refried Black Beans
1/8 teaspoon Cayenne
1 cup shredded Italian Blend (or Mexican Blend) cheese

1. Pre-heat the oven to 350 degrees. 

2. Cook pasta shells according to package directions. Drain and set aside. In a large skillet over medium heat brown ground beef until no longer pink. Drain any excess fat. Stir in garlic, oregano, basil, and cumin. Stir in 1/2 can of the enchilada sauce. Stir in refried beans. Set aside.


3. Fill each cooked pasta shell with the beef mixture. Coat an 11 x 7 inch baking dish with nonstick cooking spray and pour the remaining can of enchilada sauce with can filled with water evenly over the bottom.

 Place each shell into the bottom of the dish. Pour the tomato sauce over the tops of the shells. Sprinkle with cayenne over top.

4. Cover and bake at 350 degrees for 25 minutes. During the last few minutes of cooking, uncover and sprinkle the tops of the shells with Colby-jack cheese. 

Bake until the cheese has melted. Let rest 5 minutes before digging in.

Wednesday, June 27, 2012

Stuffed Cabbage Rolls

Have you ever had one of those cravings that just will not let you be? Yep, me too. Which is why this week I made my hunny suffer through eating Stuffed Cabbage Rolls... which there really wasn't much suffering involved (he had seconds!). It is definitely not something I choose to eat often, only about once every 3 years or so. And don't get me wrong, I really DO like it, except when you live way out West, with limited amount of fresh produce. Peeling tight fitting cabbage leaves has never been one of my strong points in the kitchen.

Oh yes, that's a meaty sauce on TOP too!

1lb lean Ground Beef
1 tsp Crushed Red Pepper
2 White Mushrooms, chopped
1 Carrot, shredded
1 tsp Garlic, minced
1 cup Cooked Brown Rice
3 tbsp Spicy Brown Mustard
1 Egg
1/2 tsp Ground Sea Salt
1/2 tsp Ground Pepper Corns
1 head Green Cabbage (loose fitting leaves if possible)
1 tbsp Olive Oil
2 tsp Garlic, minced
1 cup Grape Tomatoes, diced
15oz can Tomato Sauce
1 tsp Oregano, dried
2 Bay Leaves
2 tsp Sugar
Salt and Pepper to taste

1) Start off by browning the beef with the mushrooms, red pepper, carrot and garlic in a large skillet. Drain well, but reserve the skillet.

2) In large bowl, whisk together the egg and mustard until creamy. Add in the meat mixture along with the rice, salt and pepper and stir to incorporate.

3) Preheat oven to 375. Generously spray casserole dish with Pam Olive Oil spray.

4) Fill large pot with water and cabbage head (little trick I learned) then place on stove over medium heat. Do not get the water boiling though! A little heat will help to loosen the tight fitting leaves. If you were lucky enough to have bought the right kind, just skip this. Gently pull off leaves, one at a time until you get 8 leaves. Now, raise the heat up a bit to a low simmer and let the leaves soak (a couple at a time) in the water until they are limp.

5) Using tongs, remove one leaf and let drain back into the pot (make sure to replace it by sliding a fresh leaf under the one already in the pot), then lay it out on a cutting board or any flat surface. Fill with 1/4-1/2 cup of meat mixture.
Gently roll up like a burrito, holding it together with a toothpick slid through the rib. Place, seam side down, in casserole. Continue until all leaves have been filled, reserving any meat mixture left over.

6) Return heat to skillet and add olive oil, garlic, tomato sauce, meat mixture and diced grape tomatoes, stir. Add in oregano, bay leaves, sugar, salt and pepper and stir. Cook about 10 minutes on a simmer, stirring frequently so as not to burn the sauce.  Pour over top of the cabbage rolls. Cover casserole dish with tented foil and bake 40 minutes until bubbly.


7) Remove from oven and sprinkle with fresh grated Parmesan Cheese, serve.

Thursday, June 14, 2012

Chicken with Peach Bourbon Sauce

A couple of weeks ago, my hunny and I had a little trip to Bastrop, Tx to witness his granddaughter graduate. I tell myself that was the reason for going, but in reality it was the thought of a real grocery store, a Walmart, Target and of course Specs... the liquor warehouse. We also made a stop at this cute tourist trap that sold local peaches and pecans. We had been planning on stopping there for a while just had never gotten around to it.

I found this great little jar of Peach & Jalapeno preserves that I bought for my honey since he loves spicy foods. It was a flavor combination I thought would make a great sauce for grilling. Instead, I cooked it down into this wonderful baked chicken that fell apart when I used tongs to get it out of the pot. DELISH! I also used a Hot and Spicy pre bottled BBQ sauce to add to the kick. Unfortunately, the sugars in the preserves over powered the spicy. So if you want it hot, make sure to add some more peppers!

This serves 2-3 people. The original recipe I found calls for a lot more chicken than what I had so I cut it down.


6 boneless, skinless Chicken Thighs
1 tb Butter
1 tbsp Olive Oil
3 tbsp Minced Garlic
1 cup Red Stag Black Cherry Bourbon
6oz Bar B Que Sauce
4 oz Peach Preserves
1/2 cup Water
1 tbsp Worechestershire Sauce

Oven to 300

1) Melt butter with oil in heavy pot. Lay thighs in butter and let brown on both sides; remove to platter.


2) Add garlic to the pot and stir. Cook for about 2 minutes and add the bourbon. Stir, scaping the bottom for a couple of minutes to let the liquid reduce down. Pour in BBQ Sauce, peach preserves, water and worechestershire sauce, whisk to incorporate.

Return chicken to pot, draining juices off platter, cover and place in oven.

3) Bake 1 1/2 hours.

4) Serve with mashed potatoes or rice.

Monday, May 21, 2012

Shrimp Arrabbiata ala Terri

I bet you all thought I had forgotten about you. You were mistaken. I have just been so busy working at the new Bistro that I barely see my computer much less my own kitchen! I have completely run out of my freezer foods I had stocked up. And with my current one day a week off I do not see it getting replaced anytime soon. But, never fear, I plan on cooking up at least one meal a week now and getting them posted for all to enjoy.

This recipe is a HUGE winner today with my hunny. Allergies prevent me from even tasting it due to the shrimp, but he does have a great pallet so you can take it from him that it is something that will be cooked often in our home. Its quick, easy and uses canned and dried foods most people already have in the kitchenns. The sauce is pretty versatile as long as you do not mind spicy foods. I'm betting it would go great with some Chorizo or Linguisa!


16 oz Angel Hair Pasta, dry
1 tsp Garlic Salt
16 oz Tomato Sauce
4 oz Tomato Paste
2 tsp Oregano, dried
2 tsp Basil, dried
1lb Shrimp, deviened and shelled
2-3 tbsp Olive Oil
1/2 cup White Onion, chopped
2 tsp Garlic, minced
2 Roma Tomatoes, chopped
Garnish Parsley Flakes 
Garnish Parmesan Cheese

1. Cook pasta to package directions, adding garlic salt and 1 tsp basil to water.

2. Meanwhile, in large skillet over med heat, add 1-2 tbsp oil and saute shrimp for 2 minutes each side. Remove to a bowl and keep warm.

3. In saucepan add tomato sauce and paste and stir in oregano, basil and red pepper flakes. Heat to just simmer and remove from heat.

4. Meanwhile, in same skillet add 1 tb evoo and saute onions 3 minutes and add garlic, saute 1 minute then add the tomatoes and saute two minutes more. Pour in tomato sauce mixture and remove from heat.

5. To serve, place herbed pasta on plate, then shrimp, then sauce and top with parsley flakes and Parmesan cheese.

Friday, March 9, 2012

Dark Chocolate Magic French Fudge

Some of you may have had grandmothers who simply cooked. Didn't matter if it was only a Sunday, not a holiday, just Sunday... they would produce a spread that would cover the kitchen table. Yeah, I remember those days and fondly dream of them from time to time. It was a special memory a lucky few of us have. Now a days there never seems to be enough time to get the family in one room for more than five minutes.

My own mother, God help her, is pretty scary in the kitchen. I think the cooking gene skipped her generation. Although she had held all the family recipes, it's not often when she can master one. So when she finally decided to go digital with them, I was lucky enough to get my hot little hands on one of the cherished books. Below is a simple recipe for fudge. Of course I had to tweak it a bit, but it came out fabulous! Even those out there who is terrified of being in the kitchen can figure this one out!


18oz Semi Sweet Chocolate Chips (I used Dark Chocolate Chips)
1 can Eagle Brand Sweetened Condensed Milk (I used generic, sorry grandma)
1 1/2 tsp Vanilla
Pinch of Salt
1/2 tsp Cayenne Pepper (This is my own flavor that works well with dark chocolate)
1/2 cup Chopped Nuts (I used walnuts)

1) In top of a double broiler (if you don't have one, stack 2 pots that sit evenly and add water in the lower pot), melt chocolate over hot water. Add milk, vanilla, salt, cayenne and nuts. Stir until smooth.

2) Turn into a waxed paper lined 8x8 square pan. Place in refrigerator for 3-4 hours to set. Cut into squares and store in an air tight container.

Chocolate Chunk Banana Bread

As some of you know, I am allergic to many, many things. Potassium is among the long list... which means no bananas and no nuts. But one of my most treasured smells for a house to hold is homemade Banana Nut Bread. You can almost see the flavor tendrils weaving their way through every nook and cranny in the house.

My hunny also loves this smell and most definitely eating it. As you may remember, I posted a recipe last year featuring my bread with a nice homemade icing that was "TO-DIE-FOR"! I had some friends out here in the wild west try it out and felt the same way. It's one of those things I HAVE to make once or twice a year, regardless of the reactions I get.

This time around I made 2 loaves... one for him and one for me. Since nuts and bananas both have Potassium I chose to forgo the nuts and replace them with chocolate chunks. All I did was follow the original recipe (find it here) and instead of one loaf, I poured the batter into two loaf pans. On his, I added nuts and gently stirred them in. On mine I chopped up a chocolate bar (about 1 ounce) and gently stirred it in. The baked for the same amount of time in the old recipe for the small loaf.
Chocolate Chunks
Original

Sunday, February 26, 2012

Italian Grilled Tomatoes

I learned this a few years ago while working at a grill down in Seabrook, Tx. The lady who taught me Gidget, is my inspiration for a lot of things in life. She is a strong survivor of brain cancer and still had the umpft to get up and make a big batch of stuffed grape leaves (she grew the grape leaves herself). Of course I had to change a few things... she grilled them and just sprinkled them with white vinegar. After I was done with them, we were selling a plate of them for 6.95.

You want to make about 1 tomato per person as an appetizer.

1 Tomato for each person
2 tbsp Olive or Sesame Oil
Mozzarella, shredded
Basil
Balsamic Vinegar

1) Heat large skillet on high with oil.

2) Slice tomatoes about 1/2" thick. They need to be thick so they do not get too mushy in the cooking process.

3) Lay slices in hot oil in skillet and cook for about 1-2 minutes. You want to get a good sear on one side. Flip over and quickly sprinkle with basil then cheese. Cover for about a minute, just long enough for the cheese to melt and quickly remove to a serving plate. Sprinkle with balsamic vinegar and serve.

Saturday, February 25, 2012

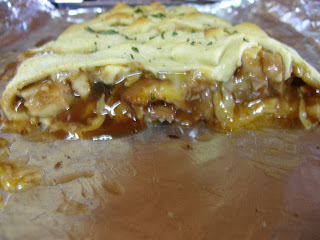
Cheesy BBQ Chicken Braid

A while back I was scrolling through the TV Guide and came across a show called "From the Kitchens of:" and figured why not? This particular show was filmed at the Pillsbury Bake Off competition and held some great ideas for me. This Chicken Braid is one of them. It feeds about 4 depending on appetite and can be improvised to fit all sorts of cravings. I think next time it will be a Pizza Braid!

1 cup BBQ Sauce, divided
1 Cup Cheddar Cheese, divided
1 cup Chicken, precooked and shredded
Garlic Powder
Parsley
1 roll Crescents

1) Preheat oven to 400. Line cookie sheet with foil and spray with oil.

2) Roll out crescents in one rectangle. Press edges of individual rolls together to form one sheet about 12x8" (use rolling pin if needed).

3) Spread 3-4 tbs BBQ sauce down the middle. Sprinkle evenly 1/2 the cheese, then all the chicken. Top with cheese and rest of BBQ sauce. Use as much or as little of the sauce as you prefer. I used only 3/4 cup and found even that was too much for my family.

4) Using sisscors, cut strips along the long sides of the dough at 1" intervals. Starting from one end, lay over one strip, then the other on the opposit side. Once you get the first two stips finished, pull up the end to close. Continue "braiding" the dough to the bottom and once again, pull the bottom to close.

5) Optional: Lightly sprinkle garlic powder (I do not reccomend garlic salt) and dried parsley over the top.

6) Bake for 11-14 minutes until the top begins to brown. Let sit 5 minutes before slicing.

Friday, February 24, 2012

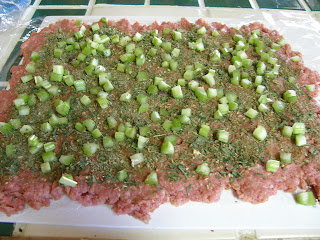
Spiraled Meatloaf Step By Step


I honestly do not remember where I came up with this idea at, but this is something I've made for many years. I can remember doing it out in Tucson, Connecticut (many moons ago), Houston, and now here. It has followed me all over the place. I've had several people try and wrestle the recipe away from me over the years, but have never parted with it. Until today. This feeds about 4 people.


1lb Ground Beef (not lean!)
1 Egg
2 tsp Chinese Hot Mustard
1 tsp Worechestershire Sauce
1 Garlic Clove, minced
1/4 cup Bread Crumbs (plain)
1 tbsp Oregano, dried
2 tbsp Parsley, dried
1/2 tsp Marjoram, ground
1/2 tsp Thyme, ground
1 Celery Stalk, diced small
1 Carrot, peeled and diced small
2 Mushrooms with stems, cleaned and diced small
1/2 cup Baby Spinach

1) Preheat oven to 350. Grease loaf pan with pam.

2) Insmall bowl, beat together egg, mustard and worechestershire. In a large bowl, gently mix together the meat, bread crumbs, garlic and egg mixture. Set in refrigerator while you prepare the rest of the ingredients.

3) In another small bowl, mix together the oregano, parsley, marjoram and thyme. Set aside.

4) Dice up the remaining ingredients except the spinach. Set aside.

5) On a flat surface, lay out a piece of plastic wrap flat, about a foot wide. Flatten out meat to no more than 1/4" thickness, in a rectangle.

Evenly sprinkle the herb mixture

then the celery

and top it with the spinach.

Next, top it with the carrot and mushrooms and gently press down across it to mush everything together.

6) Using one end of the plastic wrap, gently begin to roll up the meat, in a jelly roll fashion.

Once it is finished, place the prepared loaf pan over the top of the roll so that the seam will be on the bottom on the pan.

Flip it upright, cover with foil and bake 30 minutes at 350.

7) Remove foil, and using wide spatula, gently tip the pan to drain out the grease. Return foil and increase the heat to 375 for another 30 minutes. Remove the foil in the last 10 minutes to brown up. Let rest 10 minutes before cutting into it.

Tuesday, February 21, 2012

Berry Berry Muffins

Are there are days when you just don't want to make something from scratch, but you want it to taste like it? I have those days too. So I add to boxed meals and baking products (which we already know I'm not much of a baker). The recipe that follows uses a simple Betty Crocker Blueberry Muffin mix, easily found in ANY grocery store.

I made three types of muffins using the ingredients listed below by adding certain thing to the individual muffin tins instead of in the mix. I'm allergic to nuts so they went on some just for my hunny to eat. I ended up making 18 mini muffins.


1 pkg Betty Crocker Blueberry Muffin Mix
1/2 cup Water
1/2 cup Strawberries, diced small
1/2 tsp Cinnamon
1/2 cup Hershey's Dark Chocolate Chips
Nuts (optional- I used walnuts chopped in small bits)

1) Preheat oven to package directions. Prepare muffin tin.

2) Mix all ingredients in large bowl and fill muffin tins 2/3 full. Bake according to package directions.

3) Due to the chocolate, let cool completely before trying to remove from tins.

Sunday, February 19, 2012

Herb Grilled Shrimp

So, my hunny was hankering for some shrimp. Well, most of you already know I'm very allergic to all fish. As a matter of fact, the only thing from the water I can eat is seaweed. Good thing I like it in my Won Ton Soup! So I went on a search for a good marinade I could use since I was already grilling up my Pomegranate and Red Wine Steak. Why not make it a surf and turf weekend?!?

This one sounded yummy and was found over on the She Knows website. The recipe is made for 2 pounds of shrimp, but I found cutting it down was easy and still had lots of flavor.


  • 3 garlic cloves, minced
    1 medium yellow onion, diced small
    1/4 cups minced fresh parsley (2 tbsp dried)
    1/4 cups minced fresh basil (2 tbsp dried)
    1 tsp dry mustard
    2 tsp Chinese Hot Mustard
    2 teaspoons sea salt
    1 tsp Crushed Red Pepper
    1/4 cup Sesame Oil
    1-2 tsp Lemon Juice
    2 pounds shrimp, deveined

    1) Place all of the ingredients in a large bowl and stir to combine. Add the shrimp to the bowl, toss to coat with the mixture and marinate for up to 2 hours covered and at room temperature.

    2) Brush the grill rack with oil and prepare the grill on medium heat. Place on shrimp and grill for 2 minutes on each side. If you do not have a rack like the one in the picture, soak wooded skewers in water for 30 minutes then slide on the shrimp and grill.

Red Wine and Pomegranate Top Sirloin

Oh yes... so decadent... so rich and oh so yummy! I first came across this last year when I was waiting on my surgery date to get here. I didn't have a lot to do but sit in front of the TV watching the Food Network and Cooking Channels. As I was flipping through, Sunny Anderson appeared making this wonderful dish that had me drooling even though food was the furthest thing from my mind.

About two months after surgery, I finally made it. WOW... it was so good I forgot to take a picture of it before it was devoured. I had a few grumblings over on my Facebook page about that "lack of good manners" so I made sure I had a camera ready THIS time. The marinade/sauce makes just enough for 2 servings, so double up if your looking to feed more.

(If your gonna drool, at least wear a bib!)


2 tbs Mollassas
2 tbs Honey
1 tbs Sugar
1 tsp Salt
1 cup Pomegranate-Blueberry Juice
1 cup Red Wine
1 tsp Pepper
2 Top Sirloins, at least 1 to 1 1/2" thick, trimmed of excess fat
1/2 cup Vegetable Oil
3 clove Garlic, minced
2 large Portebella, sliced (or any mushroom. I used plain old white)

1) In large bowl, whisk together molasses, honey, sugar, salt and pepper, juice and wine, adding extra juice/wine to make 3 cups. Pour half into medium saucepan and place on stove over medium-low heat.
With remaining liquid, whisk in oil, and pour into large plastic zip lock bag with steaks. Seal and set aside to marinate 1 hour to overnight.

2) Meanwhile, to the saucepan add garlic and whisk well. Keep whisking frequently for 45 minutes to an hour. After about 30 minutes, add the mushrooms. Let the liquid reduce down until its a good thick gravy.
When steak has marinated, place on HOT grill. 4-5 minutes on first side, flip, marinate and grill til done. Let steak stand for 10 minutes before slicing to let the juices flow back throughout it. Slice steak and cover in reduced sauce. 

2 Way Cauliflower

I know I know... this isn't a favorite of my hunnies either. He prefers straight up green beans out of the can or potatoes. When I throw something new at him, all he does is grump the whole time its being made. Ahhh... but when its finished and he takes his first taste... now THAT'S a whole nuther ball of wax!

I was nice this time around by making cauliflower the way he will eat it, smothered in cheese. But I was in the mood for mashed potatoes, minus the potatoes. I saw a very interesting dish being made on Simply Delicioso  called Spicy, Smoky Cauliflower Mash that looked like something I might eat. I just wasn't too thrilled with the idea of blending it until it became liquid. About the same time I saw Rachael Ray preparing her Cauliflower Pasta Sauce and thought I could integrate the two for a dish of my own.

Since I started the dish out the same (in a big pot with chicken broth) it was easy to make it in two different styles, each of which will make about 2 servings for a total of 4.

1 head Cauliflower, cored and chopped
Chicken Broth
1 tsp Nutmeg, fresh grated
Salt to taste
1 tsp Crushed Red Pepper
1 cup Colby Jack Cheese, shredded and divided
1/2 cup Mozzarella, shredded

1) Place cauliflower bits in medium saucepan. Fill to just cover with the chicken broth and add in the nutmeg. Let cook about 15 minutes until tender. Taste before adding salt. The broth usually has enough sodium.

2) Using a pasta ladle (large flat ladle with holes) scoop out half the cauliflower and place in blender. Add 1/2 cup of the Colby and Mozzarella and hit the pulse to desired mushness. If needed, add some of the broth to thin it out. I like a lot of lumps so it doesn't remind me of baby food. Scoop into a serving bowl and cover with plastic until ready to serve.

3) Once the first is completed, strain remaining cauliflower and return to pan or serving bowl. Sprinkle with and red pepper as well as the remaining cheese and cover until ready to serve.

Saturday, February 18, 2012

Olive Dip

This past Christmas I was introduced to this dish that is simply... YUMMY! I spent my 4 day holiday in Austin, Texas munching away on this incredible dip. I just had to pass the recipe on to my readers. Its easy to make and easy to double for larger parties.


8oz Cream Cheese, softened
2-4oz Green Olives with Pimentos, diced fine
2oz Black Olives, diced fine
2 tsp Garlic, minced
1/8 tsp Dill, dried
1/4 - 1/2 tsp Crushed Red Pepper
1/2 tsp Parsley, dried

1) Place cream cheese in bowl, making sure it is easily stirred with spoon. Add in all ingredients and stir to combine well.

2) Cover with plastic and place in refrigerator for 1 hour to overnight.

Serve with crackers, veggies, cheese, meats... great all round dip.

Thursday, February 16, 2012

Italian Crescent Rolls


Since I cook for mainly just my hunny and me, most of the time I cut down the recipes I post here. I simply run out of room in my freezer when I don't. So my latest creation, "Italian Chicken Stuffed Crescent Casserole" was no different. But I had 2 extra crescent rolls to use up. I decided to deck them out a bit so they would marry well with dinner. Simple and easy, its something anyone can do to give dinner rolls just a little more umph.


1 pkg Crescent Rolls
Parmesan Cheese, grated
Garlic Powder
Oregano

1) Heat oven to package directions. Spray cookie sheet with olive oil spray (such as Pam).

2) Unroll crescents. In order as above, sprinkle each roll with the ingredients using as much or as little as you prefer. Remember a little dried herb goes along way, especially the garlic! Roll up starting with thickest end.

3) Place seam side down on prepared cookie sheet and sprinkle again with just a bit of the parmesan. Bake according to package directions.

Italian Chicken Crescent Casserole

We've all done it. Go to the store after viewing a recipe online thinking you only need just a couple of ingredients to make this dreamy new recipe. So sure of your self you just KNOW you don't need to check your cupboards to verify the list. Nope, you just trot on down (in my case its an eighty mile round trip trot) to the grocery store and run back home... only to learn how wrong you are!

That's just what happened when I tried making this dish I found over on Taste Book's site. I stood in my kitchen realizing I didn't have two of the three cheeses it called for as well as the main liquid ingredient, the Cream of Chicken soup. Never fear my brave followers! I simply improvised! The dish below serves about 6... about 1 roll per person.

PS... if you cut back this recipe to feed less folks, click here to see what I did with my leftover rolls!


1 (8 ounce) can refrigerated Crescent Rolls
1 (10 3/4 ounce) can cream of Tomato soup, undiluted
3/4 cup grated Mozzerella cheese 
1/2 cup Half & Half Cream
1/4-1/2 tsp Cayenne Pepper

FILLING

4oz Cream Cheese, soft
4 tbsp Butter, soft
1 tsp Garlic Powder
2 cups Chicken, cooked and diced
1 cup Spinach, fresh and chopped
3/4 cup Colby Cheese, shredded
2-4 tbsp Mayonaise
1 cup Colby Cheese, shredded
1/2-1 cup Mozzerella, shredded
Paprika (Optional)
Basil (Optional)

1) Preheat oven to 350. Butter casserole dish large enough to hold 6 rolls.

2) In a saucepan, mix half & half with the 3/4 cup of mozzerella and heat over medium low until the cheese begins to melt. DO NOT boil. Add soup and cayenne, stir to incorporate.

Filling

3) In a medium bowl and using hand mixer, cream together the cream cheese and butter until smooth. Add the garlic and stir. Add chicken, spinach and 3/4 cup Colby cheese and stir together to combine. Depending on how "dry" your mix is, add a tbsp at a time of the mayo. At this point you can season with salt and pepper to taste.

4) Drizzle enough of your soup mixture to cover the bottom of your casserole dish.

5) Unroll the crescents. Place 1 heaping tbsp of chicken mixture on the thick end of each roll. Starting from same end, roll up. Place seam side down in casserole dish and continue with remaining rolls.

6) Evenly our the remaining of the soup mixture over the rolls bring soup level about 3/4 of the way up the rolls. Top with remaining cheeses. Dust top with paprika and basil.

7) Bake 30 minutes. Let stand 15 minutes before cutting into it.

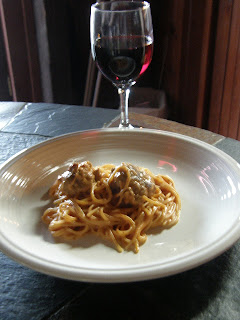
Tomato Basil Spaghetti

After another hurried Wednesday shopping in two towns, I came home feeling like I was dead to the world. I actually walked blisters onto my feet! But, dinner MUST go on! So I pulled up my big girl panties and continued on into the kitchen.

I was hankering for spaghetti but since it was a bit late in the day, I opted for something not quite so heavy and came up with this little number that was silky smooth and brought to mind grilled cheese sandwiches and my days growing up. The sauce was basically a soup I cooked my pasta in! Oh yum... I should have tried this a long time ago!

Now, I used my leftover meatballs from my "Almost Ina's Wedding Soup" recipe which is a mix of ground chicken and pork sausage. I had tucked them away in the freezer for a day like this, when I just didn't have too much energy. But you could always use the premade frozen kind you can find in your grocers freezer or opt out of the meat all together. This serves about 4.


1 can Tomato Soup
2 tsp Basil, dried (or 2 tbsp fresh chopped)
1/4 cup Cream Cheese, softened
Meat Balls (2-3 per person)
Salt
1 lb Spaghetti

1) In large pot of boiling salted water, cook pasta according to package directions for al dente. Drain, reserving 1-2 ladels of pasta water.

2) In blender, add your soup, basil and cheese and puree until the cheese is fully incorporated into the soup mix.

3) In large skillet, heat the meatballs according to package directions. If you are using leftover homemade meatballs, add 1 tbsp oil to skillet, place meatballs in it and cover. Cook on medium low until heated through. Add the tomato sauce from the blender and gentle heat the sauce and the meatballs.

4) Add in the pasta and toss to mix it with the sauce. The pasta will continue to cook and absorb the sauce. Remove to plate when pasta is cooked (only about another 3-5 minutes).


Tuesday, February 14, 2012

Review of Van Horn Cattle Company

I know, you normally find great recipes and funny antidotes here but I felt I should warn those of you in my area about this place. A few weeks ago my friends heard me raving about this great steak house in Van Horn, Texas. Unfortunately, I was led astray. So read on if you live here, are planning a trip here (or in the area) or if you are in the food industry in any way. Maybe this will help to keep other places from making these mistakes.


A few weeks ago my hunny and I stopped in Van Horn for dinner after a day hiking Carlsbad Caverns and surrounding parks. Needless to say we were famished by the time we rolled into town. What was surprising though was the meal. A friend had told us to either stop at Chuy's or the Van Horn Cattle Company, those two being the best in town.

When we drove past Chuy's and saw the food being cooked outdoors, I had second thoughts. Go ahead, you can say it, I'm a food snob. Yes, I admit it. And being one has made it extremely difficult in finding a good place to eat at since moving to West Texas.  But on this day I had found heaven in the Cattle Company.

Upon entering I spied a gorgeous dark wood bar, a TV dinning room to our left and a more intimate dinning room to the right. The staff was friendly and knowledgeable as dressed well. I had high hopes for the food. I wasn't wrong.
I ordered the 8oz Top Sirloin with Grilled Asparagus and Bourbon Honey Carrots. The steak I was able to cut with my butter knife.  The asparagus (which is something I am just starting to eat) was grilled to perfection, not too crisp and not too tender. The carrots just melted in my mouth. I was in a state of shock! I hadn't had service/food THAT good since leaving Houston, Texas and steak hasn't been that good since my wedding night back in 96!
So it just seemed natural for us to make the hour long drive to Van Horn again to enjoy an early Valentines Diner.

We were seated with me facing the cook's window. Which really ISN'T a good thing when your cook is more interested in playing than he is in cooking. The first thing I noticed was the new menus. Now, I had just looked at the menu on their Facebook page before leaving, not the same menu. Everything had gone up and the took out stuff like the Asparagus and the tantalizing Chipolte Mashed Potatoes. Replacing them with Jasmine Rice (yes, Jasmine rice in a Texas STEAK HOUSE!) and Whipped Potatoes.  Even the carrots were missing!
The next thing I noticed was the rolls they bring out after you order. They used to have cute mounds of creamy butter in a plastic cup. Now they served rock hard butter packets you would find in any cheap dinner along the highway. So hard in fact, it tore through the rolls. 

Meanwhile, in the kitchen, the cook is apparently training someone. He is showing her around the kitchen, chatting, laughing, showing her things on his phone... doing everything else besides his job... cooking my food! More and more people are showing up. There was only 3 tables to start with, all of which already had their food. 
We waited about 45 minutes to be served. Never saw the waitress unless she was taking another table's order. Once the food was finally brought to the table, disappointment reigned. We found out why the food took so long coming out of the kitchen. If the young man in the kitchen had really been doing his job (or so I thought at the time) we might have avoided this.

My hunny doesn't get seafood very often since I am highly allergic to it. So he had ordered the Salmon with Green Bean Almandine and the Jasmine Rice (the plate was set up this way on the menu, he had no choice in the sides). The salmon patty was very dry and over cooked. Even I could see that from across the table. The Jasmine Rice, was mushy and clumped together and the green beans weren't cooked at all, raw without the almonds!
Now on to my plate. I had ordered the same 8oz Top Sirloin, Medium Rare, with the Whipped Potatoes and Roasted Carrots. First thing I noticed before the plate even left the waitresses hand was, roasted does NOT mean burnt. Both ends of the carrots were black, with the middles mushy. The Whipped Potatoes were dry with lots of chives and a bigger portion than anything else on the plate. Then the steak. Major disappointment. The size of my first, he had cooked it so long it was curled into itself. Not a bit of pink to be found.

After about 10 minutes I was able to flag our waitress down and told her to bring me a plate to put the steak on since it wasn't cooked to order. I couldn't eat something the man had just murdered! After another 20 minute wait, where I had eaten my sides and my hunny had already finished his plate, my steak returned. Only it wasn't my steak. We are still not sure what kind of cut it was. Burnt on the outside and literally raw on the inside, it had a little bit of meat and nothing but fat. But it was large enough to cover my plate. I managed two bites before pushing it away. 

The entire time the cook glared at me through his window, ignoring other peoples food. I know this because every other plate that came out of the window was returned to the window to be recooked. 

We asked to speak with the manager and was told they didn't have one. 

At least the waitress took my steak off the ticket. But it will be the last time we drive out to Van Horn for dinner. 

Van Horn Cattle Company on Urbanspoon

Monday, February 13, 2012

Egg Drop Soup

Something so delicious shouldn't be this easy to make! I was surprised when it came out in just a few minutes. This is definitely my new "go to" soup that is quick, easy and something I will always have the ingredients for!

Basically you use 1 cup of broth and 1/2 an egg and 1/2 an egg yolk per person. The recipe below is what I came up with for just me and my hunny and had no leftovers. Check out the original recipe over at AllRecipes.com.

(I was almost finished with my bowl before I realized I forgot to take a picture!)

2 cup Chicken Broth (low sodium), divided
1/8 tsp ground Ginger
2 tbsp frozen Peas & Carrots (or 1 tbsp chives)
2 1/4-3 tsp Corn Starch
1 Egg
1 Egg Yolk
Soy Sauce to taste

1) Pour into pot your chicken broth, reserving 3/4 cup. Into the pot add the ginger and veggies and give it a good stir. Turn heat to medium high to bring to boil.

2) In small bowl, whisk together egg and egg yolk. Using fork, drizzle egg mixture into soup while it is boiling. This should cook the egg immediately. Continue until all the egg is added. then lower heat to medium low.

3) In small bowl, whisk together the reserved chicken broth and corn starch until smooth. Add to soup and stir to incorporate. Simmer on low until you get the proper consistency.

4) Serve with soy sauce so each person can season it to their own taste.

Friday, February 10, 2012

Grilled Chicken 3 Ways

A few of you know that I spent yesterday over the grill. You might think I'm nuts to do this in the winter, but here in West Texas, the weather changes quicker than a woman changes her mind. The local lore is "If you don't like the weather, wait 15 minutes!" And their not joking! A couple weeks ago it went from a full blown blizzard (that's about an inch in 4 hours here) that lasted 5 hours to not a speck of snow 15 minutes after the snow stopped. Yep, that's my home. And yesterday was a nice, spring day, sun shinning, not a cloud in the sky and about 66 degrees! You bet I was out grilling!

In my family, we like to grill up as much meat as possible at once. In the long run it saves time and gas. I've mentioned before how expensive things are out here, propane isn't any better. So we hit a sale on chicken and sausage and went to town on several different types of flavors. Below you will find three different marinades that have a party in your mouth with every bite!

(The sun wasn't working with the camera, so sorry)

This first one I found on a web search and was pleasantly surprised at how flavorful it was. The ladies who posted this one on About.com did a wonderful job. Click the recipe name to see how it was originally.


2 pounds boneless, skinless Chicken Thighs (pargiot in Hebrew)
1/2 cup Vegetable Oil
1/4 cup Red Wine Vinegar
1/4 cup Soy Sauce
1/4 cup Lemon Juice
1 tbsp Mustard
1 tbsp Parsley, fresh and chopped
2 tsp Garlic, minced
1/2 tsp Crushed Red Pepper

1) In a bowl, mix all marinade ingredients.

2) Rinse under cold water and pat dry the chicken. Place the chicken on a zip lock bag and pour in marinade. Place in refrigerator over night.

3) Preheat grill (medium) to 325°F (170°C).

4) Remove chicken thighs from marinade, but don't discard marinade. Grill over medium heat for 5 minutes. Turn the chicken pieces over, brush them with marinade, and grill until they test done (about another 3-6 minutes).

The next one I found again on About.com (they have some really good cooks on this site!) and fell in love. Well, if you know me, you know how much I LOVE Asian foods! Give the name a click to check them out!


1 1/2 pounds Chicken Thighs, boneless, skinless
4 tbsp Rice Wine Vinegar
4 tbsp Soy Sauce
2 tbsp Sesame Oil
1 tsp Ground Ginger
2 tsp Garlic, minced
2 Scallions (green onions, spring onions), finely chopped
2 tsp Brown Sugar
1 tsp Crushed Red Pepper, or to taste

1) Rinse the chicken thighs under cold running water and pat dry with paper towels.

2) In a medium bowl, whisk together the vinegar, soy sauce and sesame oil. Whisk in the ginger, garlic, scallions, brown sugar and crushed red pepper.

3) Place the chicken thighs in 1 large resealable plastic bag and place in a bowl. Add the marinade, reseal the bag and marinate the chicken in the refrigerator over night, turning occasionally. (If needed, use 2 small resealable bags and divide the chicken and marinade between them).

4) Preheat grill (medium) to 325°F (170°C). Remove the chicken thighs from the bag, reserving the marinade. Lay flat on the cooking surface and grill for 5-8 minutes then flip over and baste. Cook for another 5 minutes or until the thighs are cooked through and the juices run clear.

If you remember my Dilly of a Lemon Chicken dish a while back (and loved it) then you might recognize this marinade. I used the main flavors from it to create this following marinade. A light, dilled flavor to tickle the taste buds!


6 Chicken Thighs, boneless, skinless
1/4 cup Vegetable Oil
3 tbsp Lemon Juice
3 Garlic Cloves, minced
2 tsp Dill, dried 
1 tsp Red Pepper Flakes


1) In large bowl whisk together marinade.

2) Rinse chicken in cold water and pat dry. Place in a zip lock bag and pour in marinade. Let sit over night.

3) Preheat grill (medium) to 325°F (170°C). Remove the chicken thighs from the bag, reserving the marinade. Lay flat on the cooking surface and grill for 5-8 minutes then flip over and baste. Cook for another 5 minutes or until the thighs are cooked through and the juices run clear.